


How to Make the Best Buttery, Flaky, Gluten-Free Pie Crust
Say goodbye to gooey, soggy, pasty, tasteless, gluten-free pie crust. We’re thrilled, and you will be, too, with this recipe for gluten-free pie crust that produces a delicious-tasting golden-brown buttery, flaky pie crust that you’ll be proud to serv


Classic Buttery, Flaky, Gluten-Free Pie Crust
Make this basic pie crust recipe for savory or sweet gluten-free pie!
Buttery and flaky, just like you remember (except made without wheat or gluten), exiting the oven looking deliciously golden brown. Yes, a great gluten-free pie crust is possible! In this post, we show you how to make this super simple and practically fail-proof gluten-free pie crust at home that’s perfect for making savory or sweet pies.
Single or Double-Crust RecipeThis is an easy recipe to make for any single or double-crust pie... Savory or sweet, this gluten-free pie crust recipe produces a delicious-tasting golden-brown, buttery, flaky pie crust that you’ll be proud to serve every time! Perfect Single-Crust Pies: Pre-bake or make this crust for any pie base that requires a Blind-Baked crust, such as a custard-filled or pumpkin pie!Easy to Roll and Cut for a Double Crust PieThis crust is perfect for making fancier gluten-free double-crust pies that include cut-out shapes and lattice tops. To achieve a golden-browned crust, brush the top with a little milk, then sprinkle with sugar for a professional-looking pie.
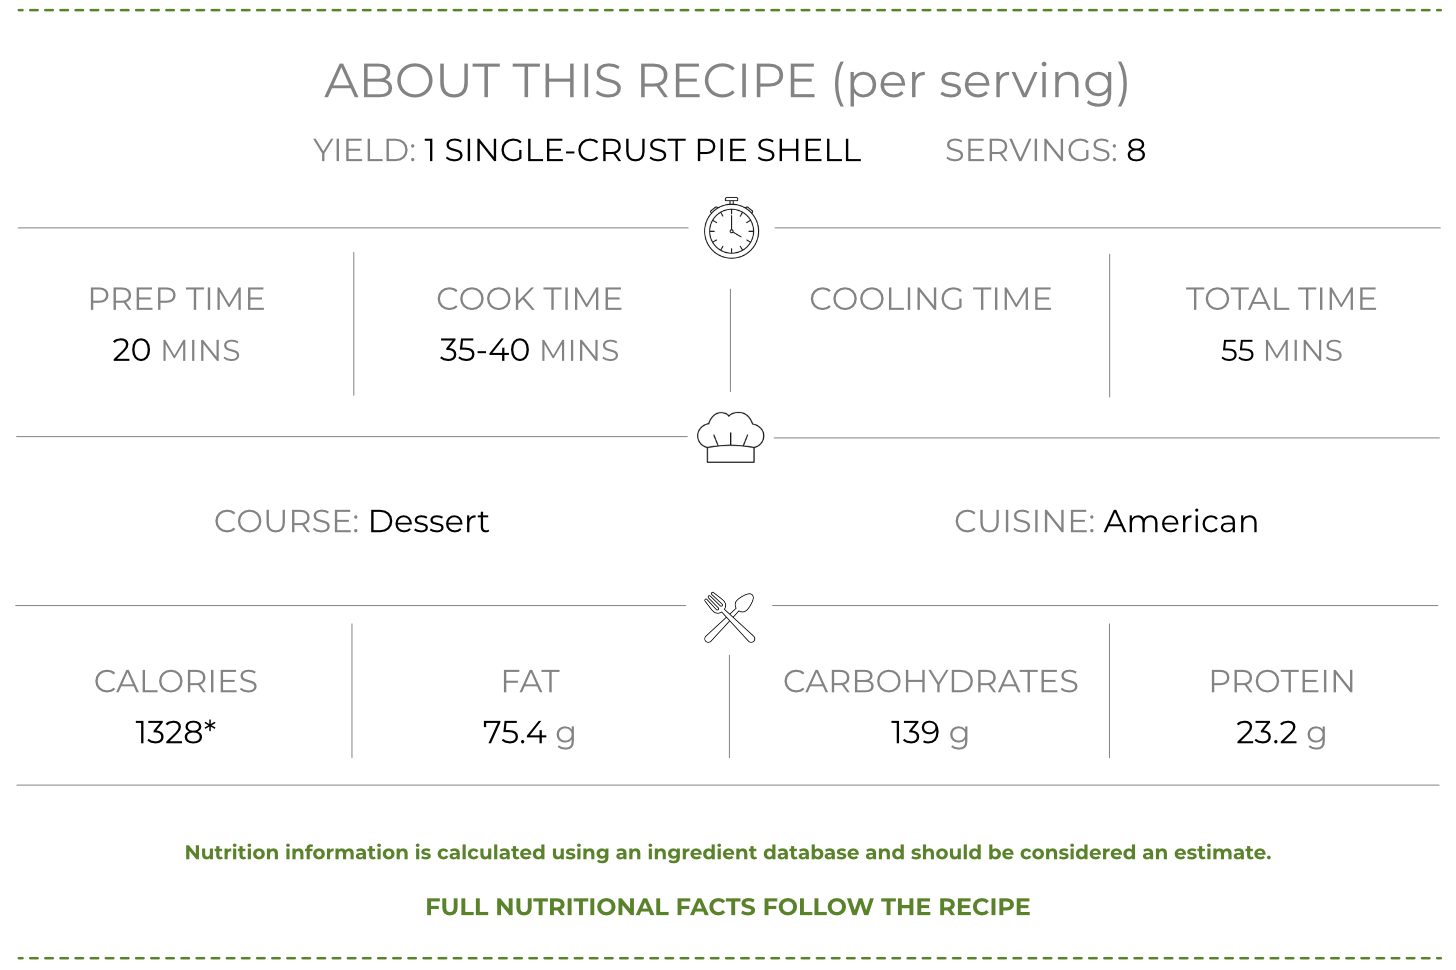
*Calories reflect the total calories combined in one single-crust pie shell. The calories of a single-crust slice (if the pie is cut into 8 slices) would be approximately 166 calories per slice before the filling.
There's just something about homemade pie.
I’ve always been a pie lover. Savory or sweet, either way, there’s just something about eating a pie. Especially when it's bursting with sweet fruit or a vegetable filling enveloped in a buttery, flaky crust, it's a comfort food eating experience that can't help but resound with pure happiness.
The problem, unfortunately, is that...
Achieving a gluten-free pie crust that meets all my expectations of a perfect pie crust has only sometimes been possible.
But then everything changed when I discovered the ideal combination of this gluten-free all-purpose flour blend. This flour has turned everything around for me. Of course, there's also a handful of additional must-have ingredients, a reliable method for making it, and a few gluten-free pie-baking tips beyond the flour.
So, if you’ve been looking for a basic gluten-free pie crust recipe that bakes perfectly, get ready to bake pie crusts in no time!
Yield: 1 Single Pie Crust -
This recipe makes enough for a single 9-inch pie crust (or two mini-pie two-crust fruit or pot pies), but it can easily be doubled to make any double-crust, lattice-topped pie, or a pie requiring a top and bottom crust.
Gut Healthy Ingredients
Gluten-Free All-Purpose Flour Blend –

After experimenting with several popular gluten-free flours and cup-for-cup combinations, we have consistently made gluten-free pie crusts that turn out beautifully with the King Arthur Baking Gluten-Free All-Purpose Flour.
One of the reasons we especially like it for making pie crust is that it contains no xanthan gum. This allows us to add just the right amount for this recipe to give the crust an excellent texture without being gummy. The flour performs well, leaving no grittiness or aftertaste.
As a footnote: The proprietary blend does contain potato starch, so if you are sensitive to flour blends that include nightshades, this gluten-free flour may not work for you.
Granulated Sugar –
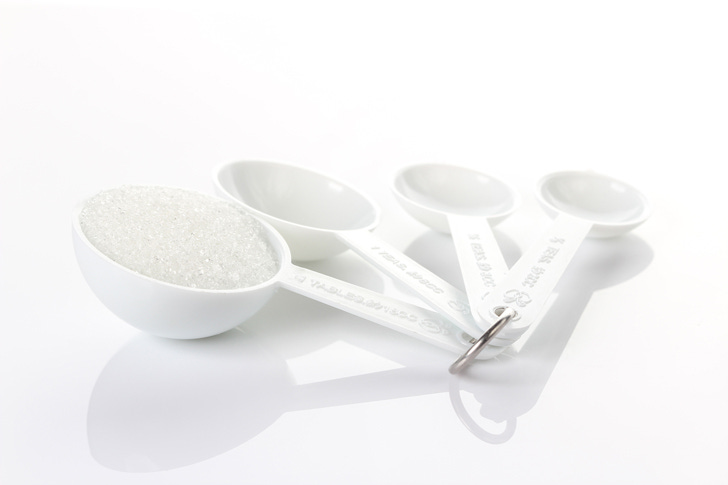
A bit of sugar helps keep the dough tender, making it pliable and easy to roll out.
Instant Modified Food Starch –
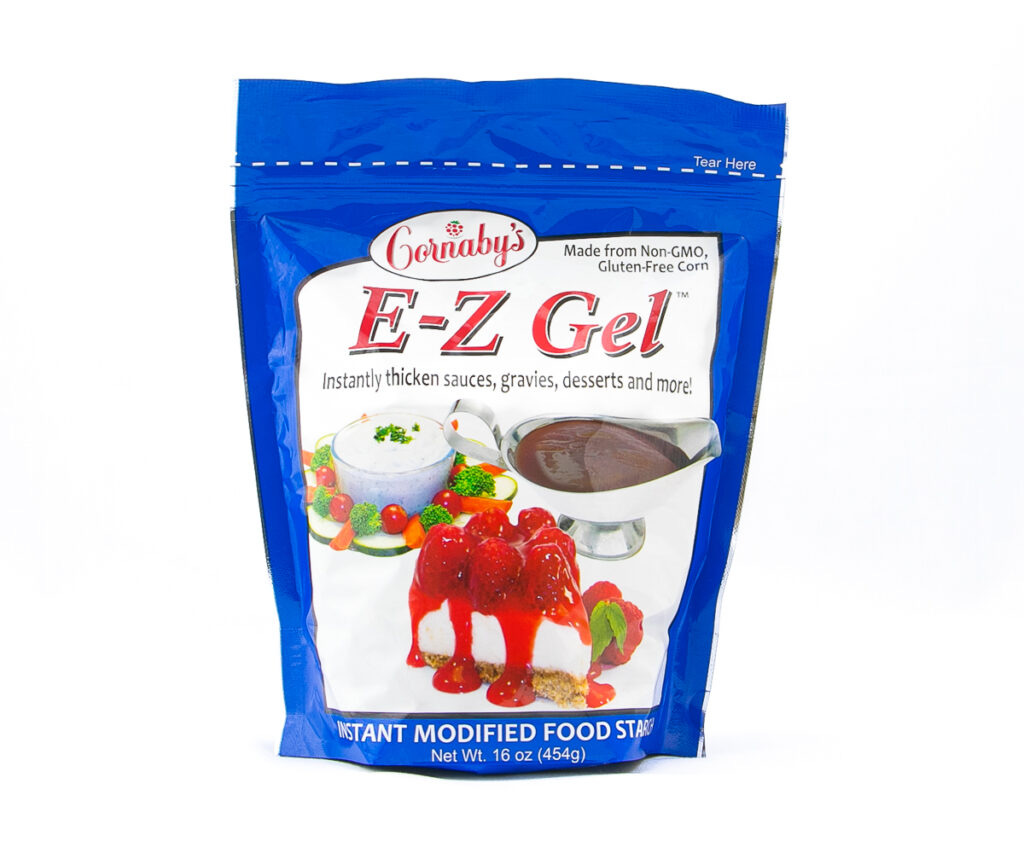
This is an optional ingredient, but we strongly recommend it. It’s the “secret” ingredient for adding body and viscosity to the dough while keeping it soft.
Unlike regular cornstarch, which can be used to make gravies, modified starch is a highly processed version of cornstarch that has been treated enzymatically and physically to alter its physical properties. While it has no nutritional benefits, it is in no way harmful.
Still, this modified version has greater stabilizing and emulsifying properties, greater thickening capacity, and better binding properties. The brand we’ve come to love (Cornaby’s E-Z Gel™) is gluten-free and non-GMO and can easily be found through online retailers.
Xanthan Gum –

Xanthan gum is the binding agent that replaces gluten in the flour, providing elasticity and stickiness to the gluten-free pie crust.
Xanthan gum helps retain some of the moisture in the dough mixture and gives the pie crust structure.
Because the gluten-free flour we’re using does not contain xanthan gum, adding it when making the recipe allows us to adjust and add just the right amount for this recipe to give the crust an excellent texture without being gummy.
Salt –

Just a little to add flavor.
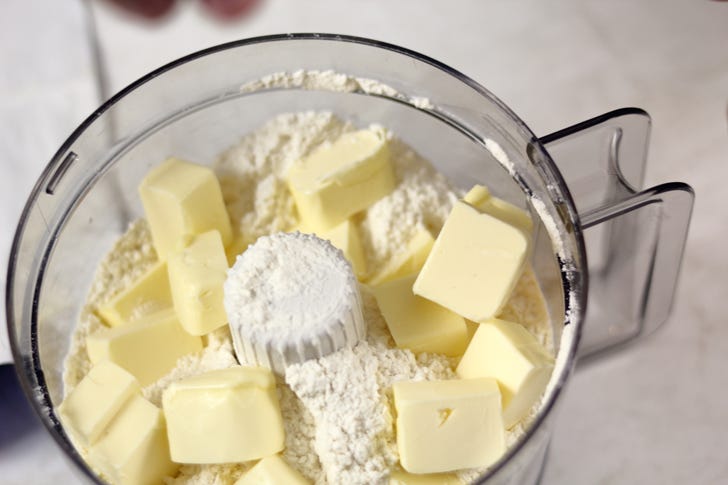
Butter –
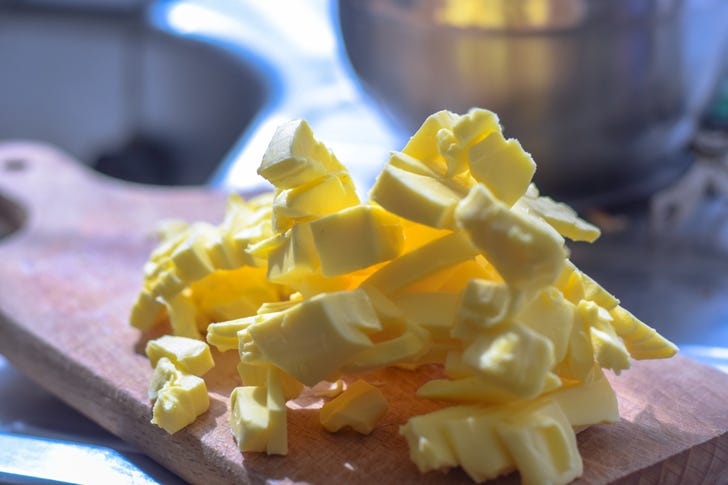
If you’re looking for flakiness, the colder the butter is, the flakier your pie crust will be. That’s because you want the butter to be as solid as possible before working with it in the dough.
Cold butter will keep its shape in layers rather than coating all the flour particles like softened butter would, making the dough too tender.
At the same time, the crust needs to be tender. So, when making pie dough, butter is cut into small pieces of flour. These pieces are small enough to coat some of the flour. This way, the butter is rolled out into solid chunks in the dough, which turns into beautiful layers in the oven’s heat as it bakes.
The butter barrier also helps to prevent the flour from binding together and absorbing too much liquid, keeping the crust tender instead of tough—and that’s good!
Egg –
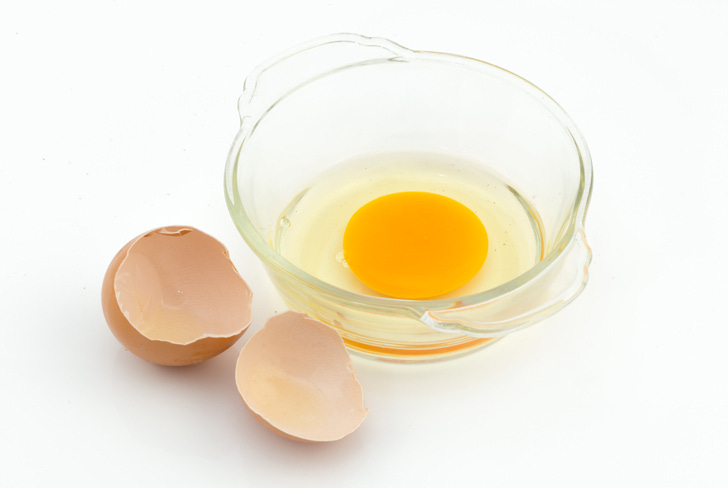
One large egg at room temperature helps in this recipe to brown the crust in the oven. For an egg-free crust, substitute four tablespoons of cold water for the egg and lemon juice (or vinegar). Add additional water if necessary.
Lemon Juice - Or vinegar,
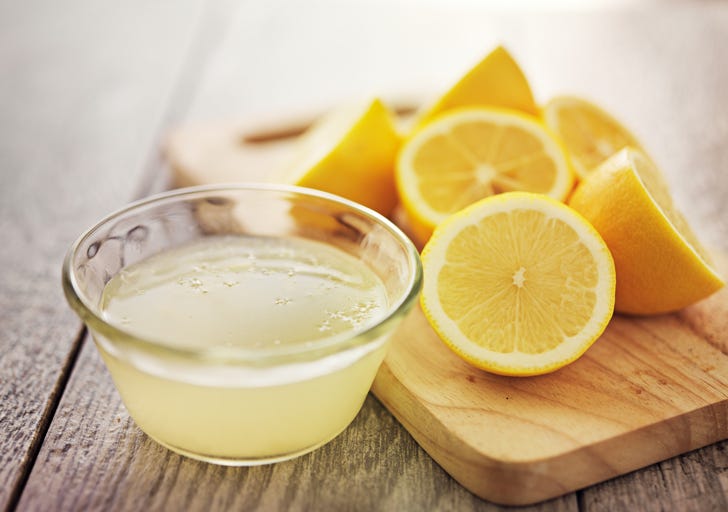
It helps to create a light and flaky texture by further tenderizing the dough and preventing it from becoming tough so that it rolls more easily.
Sign Up & Register
Answers to Some Common Questions:
Can This Pie Dough Be Made and Then Filled Later?

Yes! If you’re short on time, you can easily cover the pie plate with plastic wrap and place it in the refrigerator for a few hours up to overnight until ready to use. I’ve also rolled it to fit my pie plate, then rolled the crust up (cigar shape) while still in the plastic wrap and refrigerated it until ready to assemble my pie.
What if I want to Use a Food Processor?
While many swear by mixing dough in a food processor, I’ve used that method too - but I tend to be old-school, usually grabbing my pastry cutter. It’s so easy – either way you prefer, it should work great!
Can This Pie Crust Be Frozen?
Absolutely! This recipe is excellent for having pie crust on hand when the baking urge strikes.
For a single-crust pie, lightly press the pie dough into the bottom and sides of an aluminum foil pie plate after rolling. Crimp the top edges. Cover the crust with a double layer of plastic wrap, then bag the crust, removing as much air from the bag as possible.
To stack and freeze multiple crusts prepared the same way, put the prepared bagged and stacked crusts into an even larger freezer-safe zipper bag. Again, try to remove as much air as possible to help prevent freezer burn before zipping everything up and freezing for up to three months.
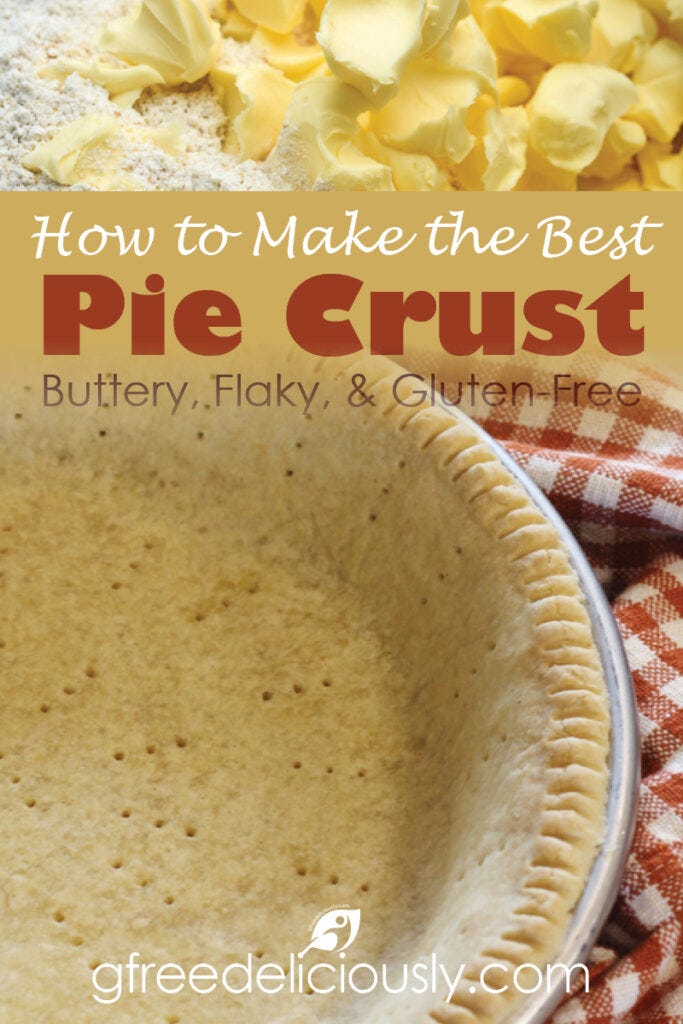
Classic Buttery, Flaky, Gluten-Free Pie Crust
Let us show you how to make this super simple and practically fail-proof gluten-free pie crust at home, which is perfect for making savory or sweet pies.
EQUIPMENT
9” Aluminum Pie Plate
bowls
Silicon Baking Mat
Rolling Pin
Utensils (Measuring Cups & Spoons, Whisk, Pastry Cutter or Mixing Fork, Table Knife)
Plastic Wrap
INGREDIENTS
1 ¼ cups gluten-free All-Purpose Flour Blend
1 tablespoon granulated Sugar
2 teaspoons Instant Modified Food Starch, (optional, although strongly recommended)
½ teaspoon Xanthan Gum
½ teaspoon Salt
6 tablespoons Butter, (cold, +enough to butter the pie plate)
1 large Egg [1], (room temperature)
2 teaspoons lemon juice or vinegar [1]
INSTRUCTIONS
For your best baking success, please read the Footnotes and Quick Tips below for single and double-crust baking tips and temperatures.
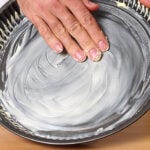
Lightly grease a 9” pie plate with butter or shortening. Preheat the oven* [2].

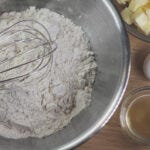
Whisk together the all-purpose flour blend, sugar, instant modified food starch, xanthan gum, and salt.

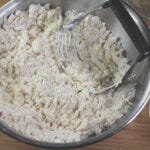
Cut the cold butter into pats, then work the pats into the flour mixture with a pastry cutter (dough blender or two forks) until crumbly, with some larger pea-size chunks of butter remaining.
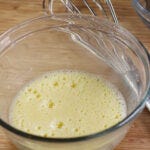
Mix the egg and lemon juice (or vinegar) until very foamy. Then mix into the dry ingredients, stirring until the mixture holds together. Gradually add 1 to 3 additional tablespoons of cold water if necessary.
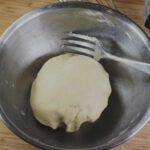
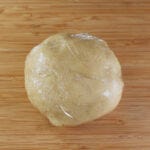
Shape the mixture into a ball, wrap it with plastic wrap, and chill for an hour or overnight until needed.
When ready to use, allow the dough to rest at room temperature for 10 to 15 minutes.

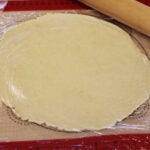
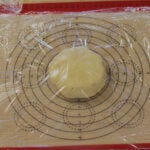
Shape the ball into a disc, then place it onto a sheet of plastic wrap.

Place another sheet of plastic wrap over the top of the disc and begin rolling from the center into a circular shape until the dough is about 1/8-inch thick.
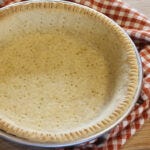
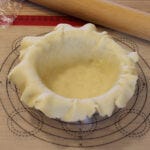
Remove the top piece of plastic wrap and invert the crust into the prepared pie plate. Press the pie dough lightly into the bottom and sides.

For a single-crust pie, use a fork to crimp the top edges of the dough, working your way around the plate.

Then, trim off the excess dough.

Fill and bake according to your pie recipe [2]. The egg makes this crust brown quickly in the oven. To prevent the outer edges from burning while baking, shield the edges of the crust with aluminum foil or a pie shield.


Kitchen Notes:
Footnotes:
[1] For an egg-free crust, substitute four tablespoons of cold water for the egg and lemon juice (or vinegar). Add additional water if necessary.
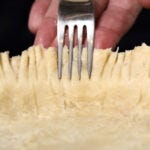
[2] If pre-baking for a single-crust pie*, prick the bottom and sides of the pie dough with a fork. Then, top the pie dough with foil or parchment paper and fill it with pie weights or dried beans. Preheat the oven to 375°F and bake for 25 minutes.
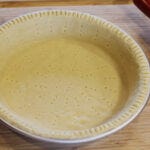
Remove the pie weights to use again, discarding the foil or parchment paper. Continue baking for 10 to 15 minutes until the crust is a light golden brown. After removing it from the oven, cool the crust until you can touch it comfortably before pouring in the filling.

For Making Juicy Fruit or Gravy-Filled Pies
Are you making a pie with juicier fruits or gravy in the filling? To prevent sogginess, apply intense heat to the bottom crust at the beginning of the baking time. Use a metal (aluminum is preferred) pie plate for the best results.
Bake at 425°F on the bottom rack of the oven for 20 minutes, then reduce the heat to 350°F and move your pie to the middle rack position. Continue to bake until the crust becomes golden brown and the filling is bubbly.
Ensure a Golden Brown Crust
The top of a double-crust pie will brown slightly as it bakes, but to achieve a deeper golden-brown crust, try brushing the top of your pie crust with milk to enhance the browning. Another pro baking tip to add sparkle and a sweet crunch to fruit pies is to sprinkle the crust with sugar after brushing it with milk.
For Pre-Baking Pie Crusts
If you’re using this recipe to make a pie that requires a pre-baked (a.k.a. blind-baked) crust as a base for a custard pie, once you have transferred the pie dough to the pie plate, use a fork to lightly prick the bottom and sides of the pie crust.
Then, top the pie dough with foil or parchment paper and fill it with pie weights or dried beans. Preheat the oven to 375°F and bake for 25 minutes.
Remove the pie weights to use again, discarding the foil or parchment paper. Return to the oven and place onto a rack in the center position, baking for 10 to 15 minutes more until the crust is a light golden brown.
After removing the pie from the oven, cool the crust until you can comfortably touch it before pouring in the custard filling. Bake the custard-filled pie as directed in the recipe, shielding the edges (as necessary) to keep them from burning.
Accompaniment, Dessert, Ingredient
American
Gluten-Free
basic, basic pie crust, Butter, butter crust, crust, easy pie crust, fail-proof pie crust, flaky crust, gluten-free, gluten-free pie crust, pie, pie crust
Enjoy the Recipe!

*Calories reflect the total calories combined in one single-crust pie shell. The calories of a single-crust slice (if the pie is cut into 8 slices) would be approximately 166 calories per slice before the filling.
Want more?
Subscribe today to Live Fully Nourished in the "Sweet Spot" Where Delicious, Gluten-Free, and Healthy Meet!
Simple and delicious gluten-free recipes, food history, stories, and more …
Family-friendly meal ideas
Gluten-free cooking, healthy eating ideas, nutrition, encouragement, and easy-to-implement lifestyle strategies
Check out more about this recipe HERE.
Get started with a 7-day free trial ...
Ready to bake some pie? Try these:
Old-Fashioned Strawberry Rhubarb Pie
Classic Chicken Pot Pie
💭 Before we go...
The Perfect Gluten-Free Pie Crust Every Time!
Over several years now, I’ve made this pie crust recipe on many occasions.
The crust is sturdy enough for heavy pie fillings and tender and sufficient for savory and sweet pies. It also works perfectly for single- and double-crust pies, apple and blueberry pies, custard and pudding-filled pies, pumpkin pies, and classic savory chicken and beef pot pies—always baking into the perfect buttery, flaky, golden-browned crust with loads of flavor.
So, if you’ve been looking for the perfect gluten-free pie crust, you’ve come to the right place! It’s the only recipe for making savory or sweet pie crust you’ll “really” ever need. What are you waiting for?
Thanks for stopping by. Have a happy time baking!
XOXO,
- Kymberley
P.S. If you create a delicious twist on this recipe or have a question or comment, please let me know. I'd love to hear! Please comment below, share it, and rate it—it’s super helpful for other readers and us.
Download the PDF printable recipe card below.